1How it works
- 1.You set up a certificate once — your header and footer images, the wording, who signs and how often the service is due.
- 2.You link it to a job type (for example an extraction canopy service).
- 3.From then on, every job of that type gets its certificate automatically the moment the technician completes it — on the phone or on the dashboard. Nobody has to create or send anything.
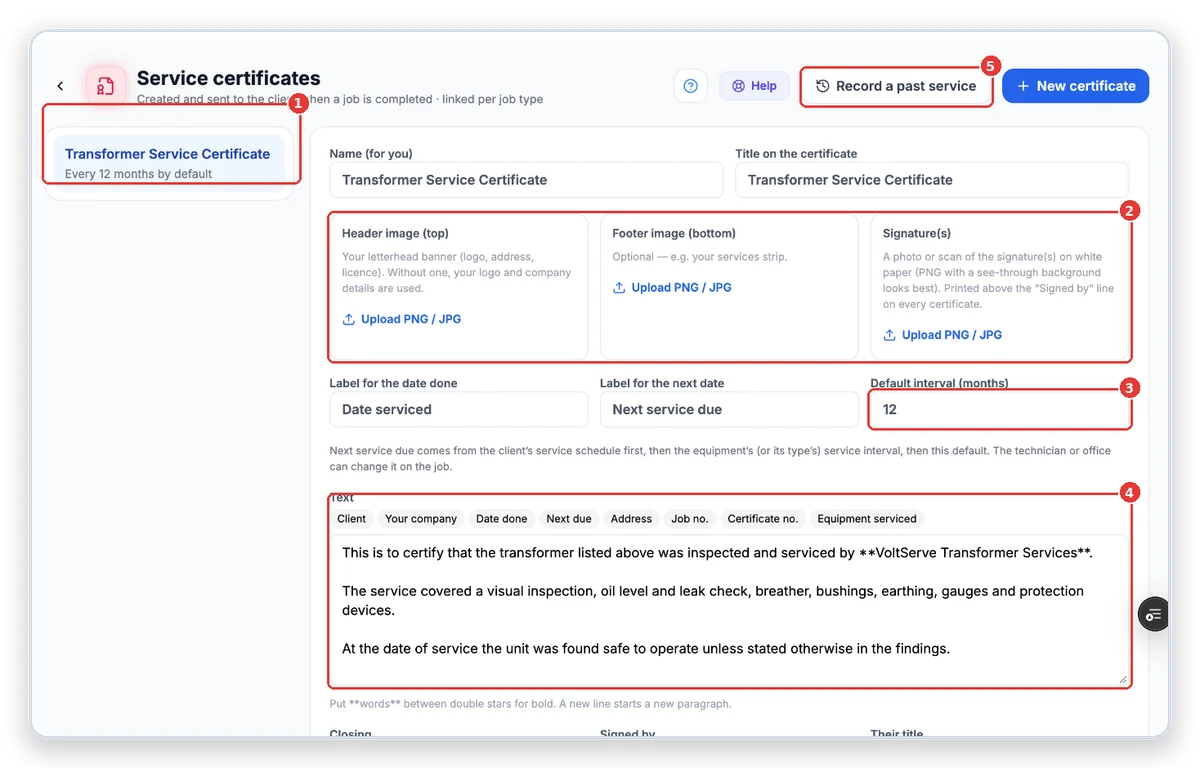
- 1Your certificate. Click it to edit.
- 2Header, footer and signature images (PNG or JPG).
- 3How often the service is due by default — used when there is no service schedule or equipment interval.
- 4The wording. Click a field like Client or Next due to insert it.
- 5Record a past service — for work done before TimeTap (see section 4).
Tip: Only jobs whose job type has a certificate get one. Check it under Job Cards → More → Job types, forms & checklists → edit the type → *Certificate sent to the client*.
2Option 1 — automatic: when and how the client gets it
- 1.Scroll down on the certificate to When does the client get it?
- 2.As soon as the job is completed — sent the moment the technician completes the job. Once the job’s invoice is paid — held until the invoice is paid, then sent by itself. Only when we send it from the job — created, but the office presses Send.
- 3.Tick Email it to the client (PDF attached) and/or WhatsApp a link, then Save.
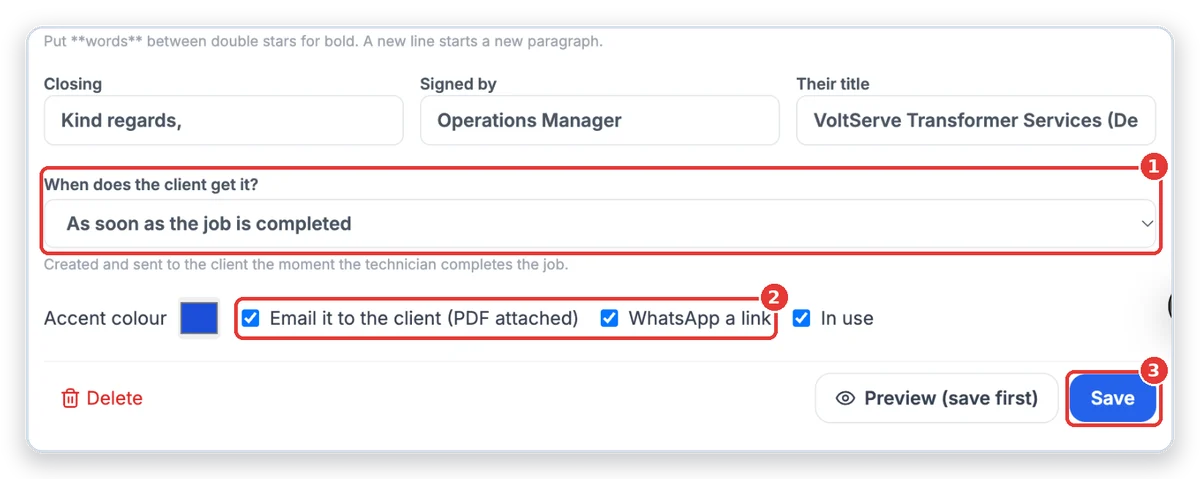
- 1When the client gets it.
- 2How it is sent: email with the PDF, and/or a WhatsApp link.
- 3Save your changes.
Tip: If the technician’s phone loses signal right after completing, TimeTap creates and sends the certificate itself within about half an hour.
3Find a certificate, or send it again
- 1.Open Job Cards and click the completed job.
- 2.On the Overview tab, the Service card shows the checklist, the next service date and the certificate.
- 3.Click the open icon to view or download the PDF, or the blue send button to send it to the client again.
- 4.Clients with a portal login can also see their certificates in the client portal.
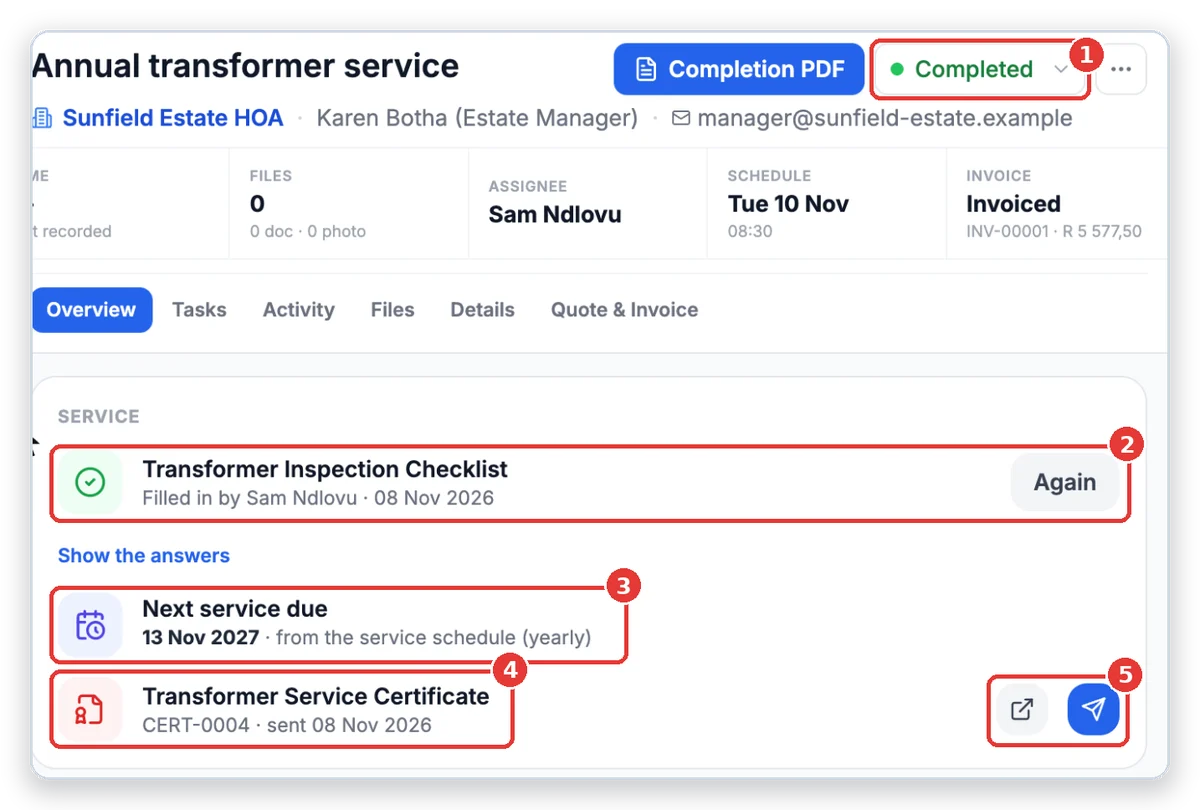
- 1The job is Completed — that is what creates the certificate.
- 2The checklist the technician filled in.
- 3Next service due — worked out for you.
- 4The certificate number and when it was sent.
- 5View the PDF, or send it again.
Important: No certificate sent? Check that the client on the job has an email address or WhatsApp number, and that the job type has a certificate. You can always press send on the job after fixing it.
4Option 2 — manual: a service done before TimeTap
- 1.Go to Job Cards → More → Record a past service (also on the Service certificates page, and as Past service in a client’s Job Cards section).
- 2.Do not create and complete a normal job for an old service — that would date the certificate today and send it to the client straight away.
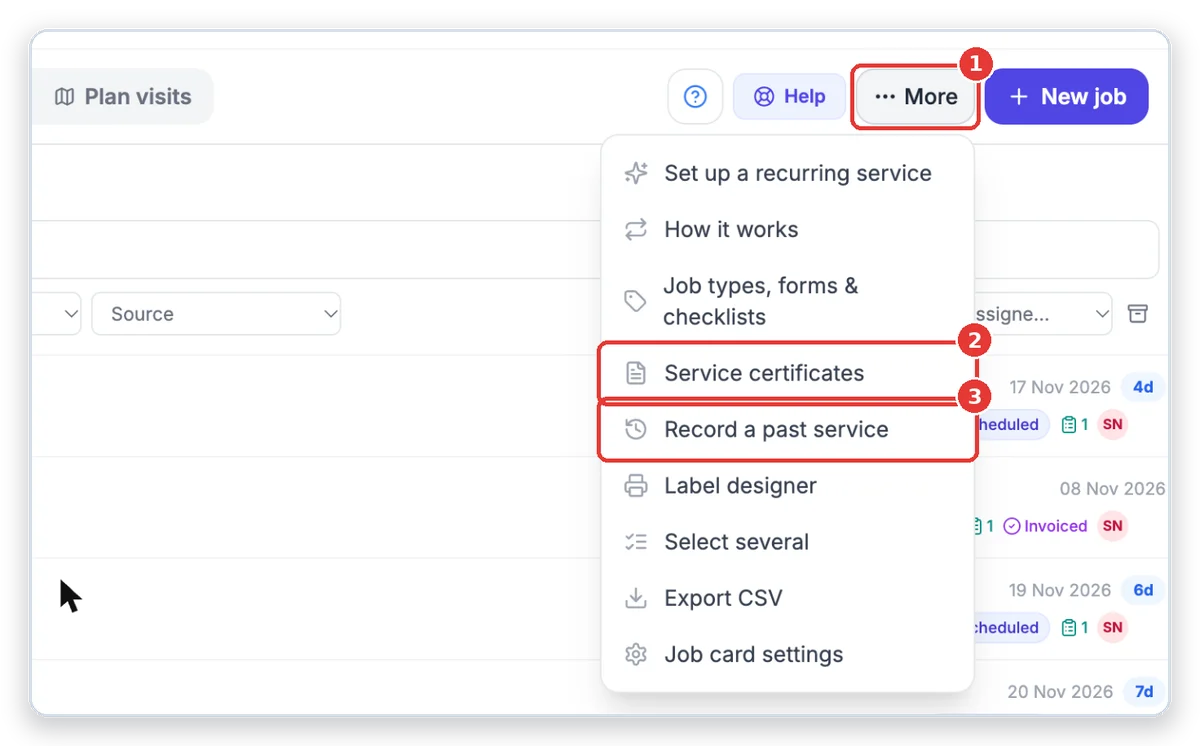
- 1More at the top of Job Cards.
- 2Service certificates — the wording and look.
- 3Record a past service.
5Fill in the past service
- 1.Search for and pick the client.
- 2.Choose the type of service — only job types that issue a certificate are listed.
- 3.Optionally tick the equipment serviced — it is printed on the certificate.
- 4.Enter the date the service was done. Next service due is worked out for you (from the client’s schedule, the equipment’s interval or the certificate’s default) — change it if needed.
- 5.Add a note if you like (e.g. the old paper certificate number). Leave Send the certificate to the client now off to just keep it on file, or tick it to send it now.
- 6.Click Save & create certificate.
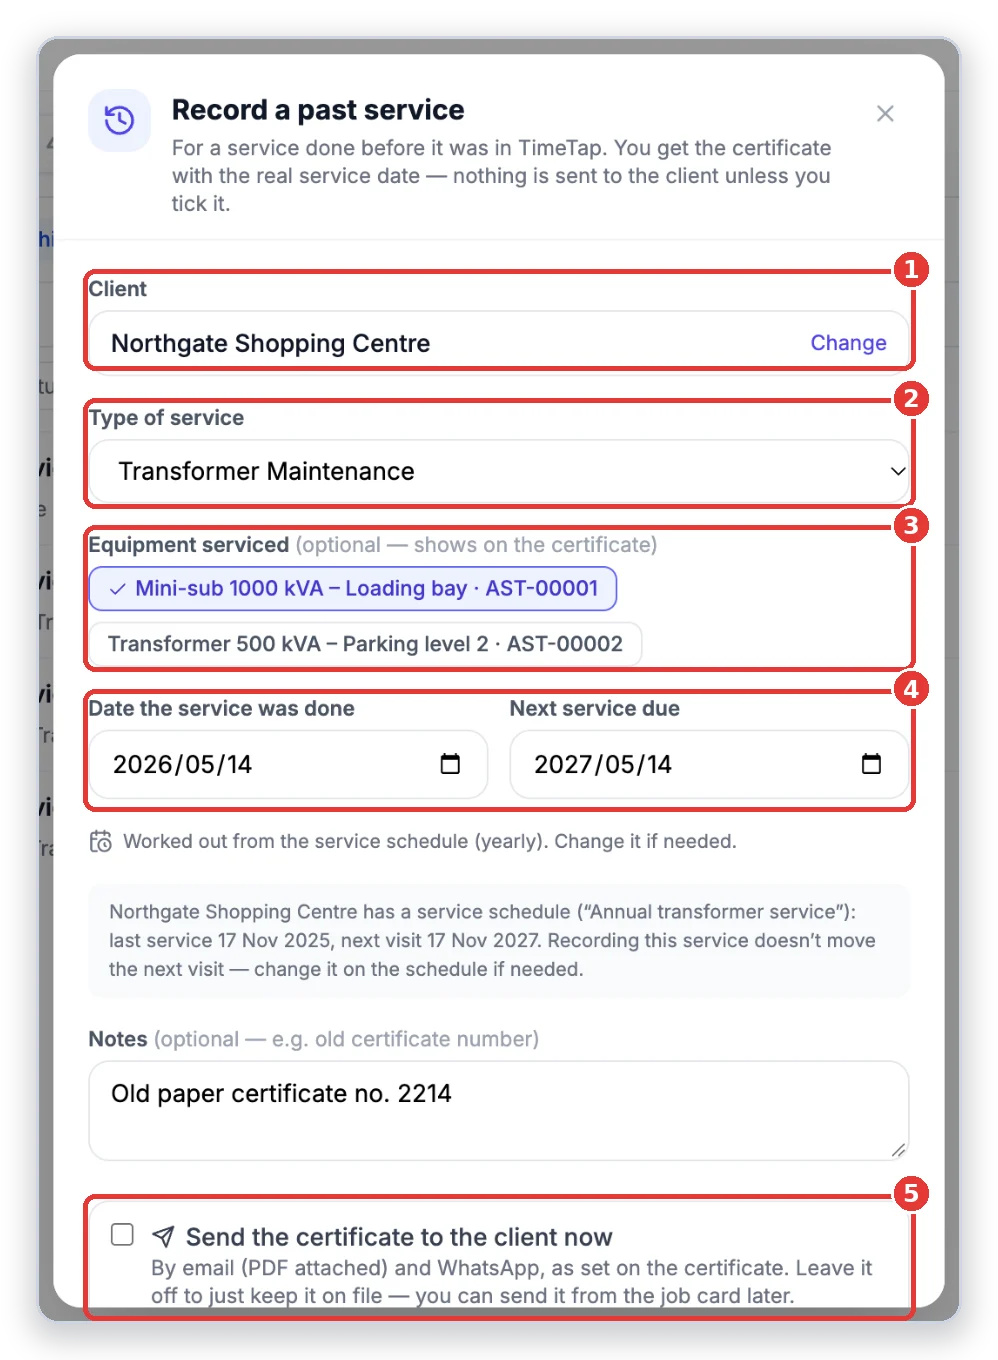
- 1The client.
- 2The type of service.
- 3Equipment serviced (optional).
- 4The real service date and the next service due.
- 5Send now? Off by default — nothing goes to the client unless you tick it.
Tip: If the client has a service schedule, TimeTap shows it here. The schedule only takes this as its last service if it is newer than the one it already knows, and the schedule’s next visit is never moved — change that on the schedule if needed.
6Done — view, open or record another
- 1.TimeTap confirms the job card number, the dates and whether anything was sent.
- 2.Click View certificate to check the PDF, Open the job card to see it, or Record another — it keeps the client and service type, so entering several old services is quick.
- 3.The job card is marked Past service and dated on the real service day. You can send the certificate from it any time.
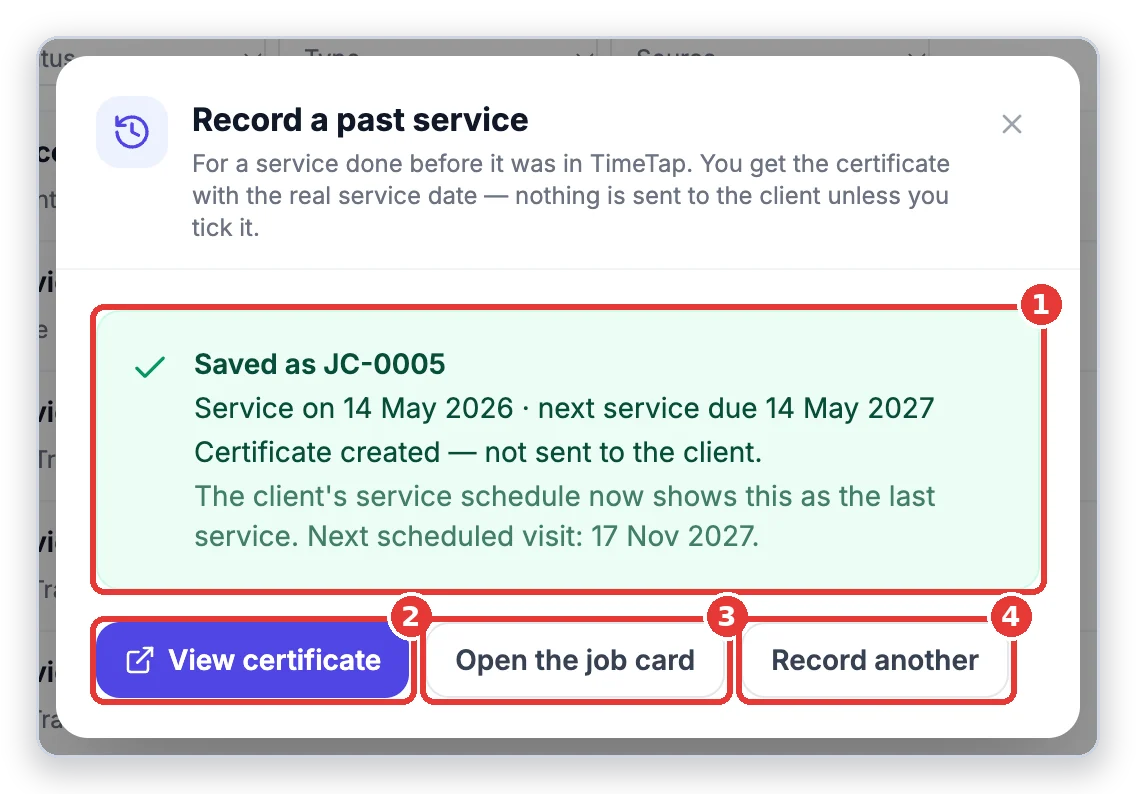
- 1What was saved: service date, next service due, and whether the client was sent anything.
- 2View the certificate PDF.
- 3Open the job card.
- 4Record another past service.
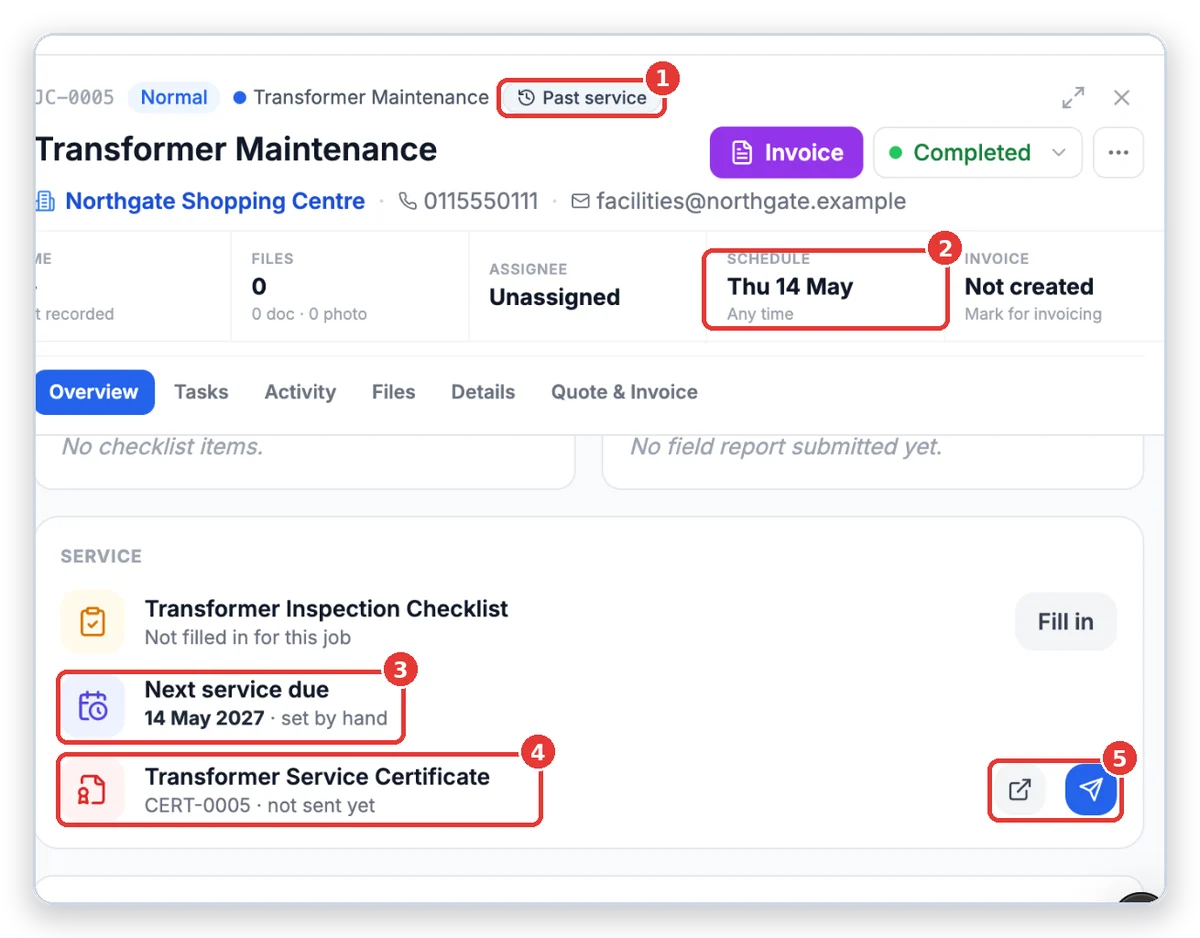
- 1Past service badge — recorded after the fact.
- 2Dated on the real service day.
- 3Next service due on the certificate.
- 4The certificate — not sent yet.
- 5View it, or send it to the client when you are ready.
Need help?
Use the feedback button in the TimeTap side menu, or ask us — we’re happy to help you set it up.
More guides
Branches & clock-in QR codes
Add your branches, sites or locations. Each one gets its own QR code that staff scan to clock in and out.
Add employees
Add your staff, choose what they can do and send them the staff-app invite on WhatsApp.
Shifts & rosters
Set up your shift times once, then build the weekly roster. Staff see their shifts in the app and lateness is worked out from them.
Who’s in & timesheet review
See who is at work right now, then check each day’s clockings and approve the hours for payroll.
Approve leave
See every leave request, check the balance and history, and approve, reject or change it.
Screens shown are from a demo company — names and numbers are made up. Your TimeTap shows your own company.